
a collection of notes on areas of personal interest
Why are there so many badly designed cards around?

Perhaps that’s a little unfair, as there are many well-designed cards being produced nowadays, but there is also a lot of rubbish. Commercial cards in Britain seem to consist of those which are thought to be humorous, badly designed traditional cards, and up-market classic cards, usually beautifully designed and constructed. And expensive. Good quality cards can usually be found in museums and art galleries, and there are a large number of charities producing cards which many see as a relatively easy way of both dealing with the problems of sourcing their cards as well as giving to charity. But they are not always well designed and many use inferior quality card which tends to diminish the enjoyment for the recipient.
Increasingly, I have noticed that people are designing their own cards. To some extent this is a response to commercial pressure providing the resources for card production, but it also appears to be the result of individuals having the confidence to assemble an idea they wish to put across. And I support this.
Do it yourself…

Most professional designers will design and/or make their own cards, often as a form of advertisement. Some of these will be individually crafted but the tendency nowadays seems for the design to be individual, but the manufacture commercial. I’ve been making them all my professional life having copied the idea from other professionals. My experience is that these cards are generally preferred by those to whom they are sent than shop-bought cards. Perhaps it’s the idea of the effort going into them being greater than that of buying a commercial card.

There are some who prefer to receive bought cards, but I would like to think they are in a minority. Where bought cards are preferred, I believe it’s for the words which some prefer to buy rather than bring themselves to write. I’m not claiming my cards are well-designed, but at least they’re individual and range from relatively unsophisticated to sophisticated, depending upon the occasion, the recipient, the amount of time available and the inspiration. Recently I saw a collection of cards I had sent to a friend over a period of years and who had kept them. It is the first time I’ve seen such a grouping as I no longer keep copies due to the amount of space they take up.
Form and format

I prefer to use an A4 format for greetings cards, with a two-fold design which has the advantage of keeping both the design and any writing on the front of the card. The card on the right is based on a photograph of a violet. It was selected for the strength of its colour, and positioned so that, when folded, there would be a strong focus on the yellow.

Another form I like for greeting cards is that of a paper bag. By folding and gluing an A4 sheet carefully, a bag can be folded and sent in a standard C6 envelope and which, when opened, will stand securely. I’m sorry that the first example seems to have been in the wars but it was one of the trials I always make and which tend to see quite a lot of handling over time.

It is possible to make a paper bag card from an A4 sheet to fit either a C6 or DL envelope, as is illustrated here. While the C6 card is a good fit for its C6 envelope – it is essentially an A5 sized bag, the DL card is not as tall as the DL envelope’s width as the envelope was designed to take the full width of an A4 sheet. Generally, I prefer to make the paper bag cards suited to being carried in C6 envelopes as, compared with the higher card, it is a little more stable unless it is intended to carry something to give weight to its base. You will see from their proportions that all the cards shown here were designed to fit into a C6 envelope.

This bag card is possibly one of the first designs of its sort that I made, at least its the earliest one I can find. Made from brown paper which I chose because of the attractive character of the pattern of lines this paper had, there were two handles added from simple strips of paper folded and glued to the two sides of the top of the bag. These have to be folded in it the bag is put into a C6 envelope. Another trial version of this bag had the circle cut out to give a very different effect but was rejected due to the amount of work involved. For a single card this would not be a problem, but for multiple productions it would be onerous.

Here is a group of five of the many that have been produced over the last fifteen or twenty years. They are all Christmas cards and were made from 100 gms paper, though 80 gms would be just as good, the form having considerable rigidity in it. The designs are simple and are only envisaged as two-dimensional designs on the face of the bag. However, there is no reason why the design might not be continued round the sides other than consideration for the way the design relates to the edges as well as the gluing that is required on one of the sides. In most cases I have the glued junction at a corner edge of the bag.

However, there are problems when carrying out this type of design. Mostly they have to do with the accuracy of the printer with its treatment of paper transport through it, and the printing software. This means that considerable trouble will have to be taken in ensuring, first, that the paper is stacked in the printer properly so that it aligns correctly in its relationship with the printer head. Secondly, there is likely to be a number of test prints taken to ensure that the printed design ends up in the correct part of the paper. In the case of this design a number of tests had to be made to ensure this was so. The right hand bag shows the eventual glued edge. The printer refused to print accurately to the edge of the paper so the design had to be amended a number of times before the printed design could be used as desired. Notice that the design still has to be lowered slightly so that it is not clipped on the top edge of the bag.

This photograph is of a paper bag card under development. It shows the two different heights of the bag when made from the same A4 sized paper and, perhaps, the more attractive height of the taller bag on the left. The pattern on the shorter bag occupies half the face, which tends to be a design error, one which emphasises the squat proportions of the bag. The card would benefit from the pattern being either taller or shorter in proportion to the face.

These small bags can even be used for containing sweets or a small present as was the case for the bag in this illustration. This was one of a series made for a child’s birthday party. The picture on the front can be anything suited to the theme of the party. It’s not likely that they will have a long life so, as mentioned above, I tend to make them out of a lightweight paper, certainly no heavier than 80 gms. Heavier than this there are problems with folding. My favourites are bags made from brown paper with a simple graphic on them.

When the card is designed to be seen landscape rather than portrait, as is the case here, I prefer to glue and fold it at the bottom so that it will stand without sagging or collapsing with time. This type of construction is very rigid and has the great advantage of apparently adding to the quality of the finished article. The only disadvantage this type of card has is that there is only a front and back for display purposes, whereas the next three have a full A4 display area and, of course, can also be written on the reverse. As can be seen the card consists only of a part of a stylised photograph with simple lettering superimposed at the bottom. It really couldn’t be much simpler, the only problem being the selection of a suitable photograph.
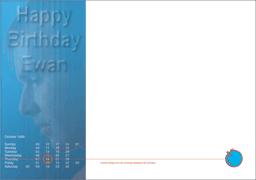

One of the benefits of using photographs on greeting cards is that you can either select a subject which matches the interest of the person for whom the card is being made, or you can adapt photos of the person to whom you send the card, personalising it to make a unique card for their enjoyment. Hopefully. This card to the right, and the two cards below it, were designed to be folded twice and with the first fold carefully considered to ensure the optimal design balance on display. Having said that, the lower two are not the type of design I would usually make, preferring the design to occupy only the first third of the card.
The birthday card to the right above and the architectural design below were obviously individually designed and based on photos but, as you can see from the middle photo, it is also possible to take an old postcard and adapt it for your specific needs, in this case the subject and location of the card having a specific meaning to the intended recipient…

The detail of the classic device – a detail of a capital I photographed in the British Museum, London – has been carefully organised so that the first fold coincides exactly with the middle of the volute. I made the effect of carving a greeting into the stone but, on reflection I wish I had made the carving follow the volute rather than have it horizontally located. I should point out that this design was selected as the capital had the advantage of simulating the number ’6’ for somebody whose sixtieth birthday it was designed for. I also see that although it looks right close up, the lettering does not display well at this scale. Perhaps it should. This may be one of the results of making cards quickly.
I enjoy making cards for different occasions and have been doing so from the nineteen sixties. At the end of the year, usually a bit late, I used to make both Christmas as well as New Year or Season’s greetings cards to suit the different beliefs and ages of the recipients. Nowadays I try to design at least half a dozen around Spring and then put them away until October when I look at them again to see which are the most suitable. I used to prefer to make cards A6 in size if for no other reason than that I could get two out of each sheet of A4 card. My preference now is to have landscape cards though tall cards display better.

Here, drawn on a scrap of lined paper when the idea came to me, is an initial conceptual sketch on the left with the finished card to its right, the theme being ‘a partridge in a pear tree’. Below is a second version with a detail of the partridge’s head. The illustrations above and below were taken from a print-out as the originals were lost, though I have now re-drawn the lower illustration with a slightly more accurate partridge’s head. As you can see from the above sketch, the original idea always has more immediacy than the finished graphic.

The following cards partly illustrate the character of the cards I used to make at the end of the year which have to suit a number of different religions and a wide age range. They’re supposed to be thought out well before the event but are often made too hurriedly – and sometimes look it. Now I tend to use a different form and, perhaps, more photos than drawings.

The two illustrations to the right were designed to suit Christmas with a particular emphasis on appealing to the children of families; the two cards below were designed to mark the end of the year or the New Year making them suitable to a number of different religions.

All these cards were drawn in a drafting programme using a trackpad and finger – not the best way of drawing fine detail but having the benefit of being available wherever you tend to sit down with your laptop. However, it is surprising what can be done without a proper drawing tablet. Incidentally, the New Year card to the right was developed from letters intended to form a complete alphabet, but I have yet to complete that exercise. There always seems to be something more important to work on.


Here are six more Christmas and New Year cards, arranged in pairs, using simple design styles, and in contrasting styles. Again two of them – the top left and middle right – have been designed for the younger children of families. The cards are drawn in the same way as I described above and don’t, therefore, require a great deal of sophistication. The greatest problem usually is thinking up the ideas, though this applies to any card, in fact it applies to any kind of design work, particularly when there’s an imminent deadline. The middle left card, together with the lower pair of cards are more formal and not really suited to children. They illustrate an important point, the middle left being far more legible than the bottom left card.
It’s interesting for me to see how these cards appear on the website pages as, to a great extent, those which are most easily seen here are likely to be seen well when placed on display. Although cards are read in the hand when received, they are similar to posters in that they are normally viewed at a relatively small distance, so need to be able to work at both short and near distances.

Contrasting with those styles are three more Seasons’s greeting cards, each of them being designed to different proportions. Those above are A6 sized – 149mm high by 105mm wide – while these are a third of an A4 sheet – 210mm high by 99mm wide. That on the left is designed with children in mind, the central one is a calligraphic style, whereas that on the right is a more sophisticated style.

Having the cards arranged portrait has one disadvantage and one advantage, both illustrated here. In order to fit into a C6 envelope only two thirds of the card can be used if the card is designed in the traditional way, opening like a book with the design on the front cover and any inscription on the inside, as shown on the right. This means cutting and discarding a third of the A4 sheet, which sometimes feels a bit of a waste. However, if the card is designed with reverse folds dividing it into thirds, as shown on the left, the design can be located over two panels, both readable from the front, or at least from a slight angle – and the double fold has the added advantage of making the card more stable in draughts.

To sum up, and excluding the bag solution described above, there are around six alternative ways I use to create greetings cards from A4 sheets of card, the basic shapes being illustrated here. The first three, 1,2 and 3, allow two cards to be created from a single A4 sheet, 1 and 3 being portrait and 2, landscape. On the bottom row, 4 and 5 are portrait, 4 being the zig-zag folded type of card, illustrated immediately above, along with 5 which has a third of the A4 sheet wasted. The last type, 6, is the folded and glued landscape card.

There is another shape of card I use from time to time, and that is one governed by the width of a DL envelope, using the full width of an A4 landscape card, 297mm. This creates a card with the fold off-centred as can be seen in this old rough mock-up for a Christmas card. In essence it is the type 2 card shown above, but with the fold made approximately a third along rather than halfway, creating a card which displays the message on the right while allowing a part of the design to be hidden within the folded area or, as in this case, to create a three-dimensional effect for increased interest.


A variation of the simple card made from a sheet of A4 card is that shown in this next group of illustrations. The presentation face is split down the centre with folds on both sides masking another design, or a continuation of the external design inside. Unlike other cards, this card has to be made from a single A4 sheet, creating a finished card 100mm by 210mm, and only one card can be made from each A4 sheet. The card could be cut down, of course, and a card 100mm by 160mm made which would fit into a C6 envelope.
There are a number of ways in which the design might be developed. For the purposes of the first illustration, the folded card has been given a simple geometric pattern centred on the presentation face together with a simple message. Opened up, as in the second illustration, a coloured version of the presentation face is shown, but there are also the hidden halves of the presentation face revealed to create a more continous design. The standing examples show the 100mm by 210mm finished design.

This final illustration shows the layout for the complete 100mm by 210mm card design. It is evident that there are a number of ways in which the design might be set out. The most important design factor is that the two halves of the presentation face must read as a complete design. In this case the two halves of the word ‘greetings’ must read as a continuous word – the chief difficulty being in finding suitable words or phrases that will fit naturally across the presentation face. Alternatively, lettering on the presentation face might be omitted and placed on the internal, hidden face.

This was another quickly made test for this type of folded card. The design on the presentation face is, again, a variation of the design found on the inside, but it is evident that the principle might be developed in a number of ways to create an alternative greeting card with either different designs inside and outside, or the same. As with many greeting cards, a number of prints might need to be made in order to obtain the precise alignment. It seems printers rarely feed paper through as accurately as is sometimes required.
The cards illustrated above will all fit into one or other of the two most commonly sized envelopes, C6 and DL:
- C6 envelopes are 114mm by 162mm and will accommodate folded A5 cards which are 105mm by 149mm.
- DL envelopes are 220mm by 110mm and will take A4 cards folded into three along their shorter width, 210mm by 99mm.
But the benefit of making cards, almost whatever the standard, is that they appear to be appreciated by the recipients for the very reason that they are designed and hand made. It really is a pity that most people will buy from the ever-increasing range of commercial cards rather than have a go themselves. There are even a number of commercial kits that help people produce something original. It is noticeable that mantle-pieces often contain more than one example of a card at Christmas, which I find depressing.

This design was also drawn the same way as the others, on a laptop using the trackpad. As you can see it’s a relatively simple diagrammatic design, quickly conceived and executed within the constraints of the capabilities of the laptop, and really carried out as an exercise, although it was given as a card. Looking back at designs like this I can see a lot of possibilities for improvement so sometimes recycle ideas – but making sure that, if it’s another greeting card, I don’t send a similar one to the same person, of course. At least, I don’t think I’ve done so yet. I should also say that ideas can be seen all around and, while it makes no sense to copy designs, designers often derive ideas from what might have caught their eye, knowingly or unwittingly.
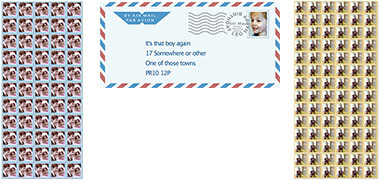
Another idea for the design of greeting cards is the use of identifiable personal images in the form of postage stamps, singly or multiple. These three greeting cards were designed from twice-folded A4 card. The two vertical cards of the three were designed with multiple images of the person or people addressed, while the horizontal card was designed to resemble an airmail envelope with the single stamp showing the individual whose birthday this marked.

To the side is part of the design of an anniversary card I made a number of years ago. Having worked out the design I wanted, I took a photograph of the bottle in sunlight to ensure I had some interest in the shadow, and then applied the lettering, the colour taken from the shadow of the bottle. Again, it’s a simple idea which seemed to work at the time but that I now see can be improved upon, particularly in the selection of the font or its kerning.

This illustration was not a card but was an old sketch used in a number of different projects, some of them greeting cards. The sketch uses a single line to illustrate a camel and rider, and a marker run round the line a number of times using the overlapping of the marker to create a heavier, parallel line as a design feature. There are, or were, some types of marker which could be used to create a uniform colour, but not this particular proprietary type.

This is another rough design which came about in developing a greeting card, and was based on the design above. It was created using an electric typewriter, another example of using the technology of the day to produce an effect dependent upon it. I think there was an attempt to use the different characters of the typewriter, but it was not successful and there is no record of it. Nowadays there are computer programmes which will do this for you, and this design would benefit from this as it would also allow the design to be created at a larger size and then reduced.

The inspiration for this card was, as you can see, a camel which used to be a regular feature of greeting cards I used to make in the days when there were limited materials in the country in which I worked – combined with the need to produce these greeting cards quickly. Each was individually drawn in black ink on glossy card and was evidently used as a New Year card with the two years appearing at the ends of the line, the greeting being written on the inside of the card in the traditional manner.
Three-dimensional designs

Finally, in addition to ordinary two-dimensional designs, I enjoy producing cards with a degree of three-dimensionality to them. They are more time consuming than an ordinary card, but can be more attractive. Because these methods do not lend themselves to multiple production, they tend to be sent to individuals and I keep no copy of them. The top card is a rough for a Christmas card design which was not developed, but which I keep around, just in case it sparks a better idea. The problem with it is its structural weakness but which was resolved by redesigning the tree holder to create a larger base.

These very rough, and rather poor sketches to the side were made for a possible card based on the construction of a Maltese watch tower, buildings which are to be seen all round Malta’s coastline and which are dramatic in their settings. They might have been improved by not having been made as doodles during a meeting – but it’s also important to get an idea down when you think of it. It’s often easier to make some initial exploratory sketches before starting to cut and fold card, though the latter is, obviously, the next stage, though I no longer have those studies.
I made some three-dimensional models for the design which, though crude, showed me that this, too, would have relatively weak points in it. Some time I’ll look at them again and have another go at resolving their problems as I think there’s the germ of an idea there… These three-dimensional cards are now relatively common and, being professionally made with die stamps look good. But at the time I started they were unusual and seem to have been mainly produced by architects or graphic designers as one-offs. The whole area, of course, relates to pop-up picture books and origami, so it is understandable that some of the first well-designed cards seem to have come from Japan.


While I’m on the Maltese theme, here is a slightly different example, the upper illustration being a scan of an original card. The three dimensional designs below have a true three-dimensional character whereas this design was purposely made to form a triangular column. Two sides of the column illustrate a typical Maltese row house. One of them shows the manner in which they are, or were, typically considered to appear, the third side illustrates the additions which so many of them have accumulated over time, sometimes immediately on construction. The third side of the column bears a list of those elements. The card was designed to be sent to friends who were architects or designers though there was also a serious comment to be made relating to the manner in which architectural designs rarely take full consideration of the elements that are added to them by owners and utility companies. The two design faces were also used in seminars to illustrate aspects of the local architecture. The lower photograph is of the finished card, the inside of the column being the location of any message or greeting, and the photograph illustrating the stable construction of this tall card.


These two illustrations show a rough mock-up of another idea I had, made from paper, and one of the finished roughs made to develop the idea, made with card. The finished result was again quite different, but similar to the rough on the right. This card was made about thirty years ago, before professionally designed three-dimensional cards were commonly made for sale, but the idea went back to cards I saw designed by friends in the nineteen seventies. The lower illustration is of the rough card above right and gives a little better indication of the graphic design of the card. Looking at it again I can see that I should have also cut and folded out the dikka on the right to create additional visual interest, perhaps as shown on the rough model above left.

Here was another attempt to use a similar subject – this time, a wind tower – as a greeting card. This was an exploratory model to test how easy it would be to make a card that had a strong three-dimensional presence, would fold readily and be easily opened and, importantly, would be capable of reproduction as a seasonal greeting card. Against most of these parameters the model failed and I never got round to looking for alternative ways of making it or a similar design. Looking at it now I wonder if it would be suited to being made with only two sides…

This exploratory card was also made around the same time using fold-ups for both the man and the hawk on its perch to give the appearance of more depth to the card, and with the man increasing the effect by pointing towards the spray painting above the dikka. But I decided against this type of paper construction as I knew from long experience that the card I used to print onto has a tendency to turn up with time and not lie flat, a characteristic that is particularly important for the base of this type of card. Perhaps its time to try out the idea again.

These two roughs were also made around the same time and illustrate slightly different approaches. The rough design on the left is a straight cut-out, intended to bring depth to the card and, perhaps, best in a rough state to match the crude drawing style. The design on the right is a folded construction which has a couple of slits cut in it and then manipulated into a face. It looked a little too scary and I never got round to making a happier version. It’s yet another idea to try out again.

The two rough designs shown here represent a different type of cut card that can bring life to a simple design. The card on the left has the outline of a dove carrying a frond in its beak with a second image lying across the fold cut out with a sharp blade. The card on the right was a sketch made for the 1996 New Year and used a double slit to create a stepped plane. This type of card has been used to great effect commercially, particularly with designs having an architectural character to them. Another example of designs incorporating cuts can be seen above.

These three cards were made thirty or forty years ago. The card on the right was another attempt to bring a three-dimensional effect to a card by creating strong shadows within an architecturally organised cut and fold exercise. The central photograph was for an anniversary and was designed to be suspended with the illustration on the left hanging from it. Both methods are a useful way of constructing a slightly unusual card for a single occasion but would be time-consuming create in large numbers.

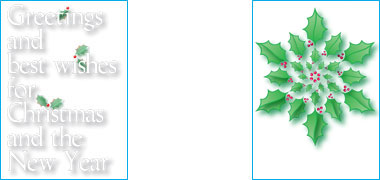
It is always useful to investigate ideas both to understand how they will appear, but also to see how easy they are to fabricate. Compared with those above, these three cards were produced as investigative rough designs for greeting cards in 2019: steps, a snowflake, and two robins – though these should preferably be a pair of turtle doves if used for the end of the year. Making cut-and-fold cards for Christmas and the New Year is not a good idea from the point of view of the time needed to craft them. This is especially so for any cards needing to be cut along a curve as they are more difficult to cut accurately. These particular designs are unlikely to be used, though it is possible that one of them might be developed as a card for a birthday or anniversary.

The few designs on this page are unusual in having been kept. As a general comment it is worth pointing out that many exploratory designs are discarded. But it is worth recording much of what you work on as you never know when you might think of a better way of developing an old design, or find a more apt reason to use one. This file, and others, contain some of my older designs, but regrettably none of the explanatory sketches. I now try to keep one example of every card I produce, but more often than not I don’t and also throw away sketches as I don’t have the space to keep them.
Paper folding

This small group of folded paper envelopes might be considered as origami, and are not particularly complicated examples at that. There are much better examples all over the Internet where their folding patterns can be learned. I have included them as, from time to time, I find it useful to accommodate small cards or gifts in these or similar folded paper or cloth constructions. They are of the type known in Japanese as ‘tato’ or ‘tatou’, and are designed as flat boxes, purses or containers.

The first two examples were made from pieces of folded A4 paper, trimmed to a square of side 210mm and, while the first example, particularly, is not sealable and permits views into the envelope, they appear to create an interest for those who receive them, perhaps because of their obvious geometrical appeal. With double-sided tape at their backs, they can also be used as rosettes on a present, perhaps made with paper coloured differently on both sides to create a more attractive design. The lower of the two examples is opened by pulling on two of its opposite corners, whereas the first does not have that mechanical capability.

Here is an illustration for the basic construction of this particular tato. In accordance with classic tradition the tato is folded from a square of paper, this illustration showing only one of a number of ways in which tato designs can be creased in order to create a four-sided tato. While you can also find eight sided tato designs which are created with square paper, it is possible to create five- and six-sided designs which are usually constructed from five- and six-sided paper shapes themselves formed by folding square paper and then cutting away the unnecessary portions. Be aware that some origami purists feel that it is wrong to cut away material.

When I first looked at the tato I had thought its side was a third of the square of paper. But it is not. Perhaps this note should have been written on one of the geometry pages in the Islamic section of this site, but the importance of this tato is in its relationship with the Golden Section. If the square of paper is considered to have a side 2x, then the diagonal of half of it – the rectangle 2x by x – is x√5, the basis for the construction of a Golden Rectangle.
This illustration shows that the geometry for the resulting tato is not quite what might be expected. Its side is 2x/√5 or 0.89443x. Put another way, the side of the tato is 1/√5 or 0.4472 of the length of the side of the square from which the tato is constructed. There is more written about the Golden Section on one of the Islamic geometry pages.
In the note above I mentioned the division of a square into three parts. It might be useful to illustrate here how this was readily effected in origami constructions, and how this might have significance in the construction of Islamic geometries as well.

Simply fold a square in half both along its diagonals as well as edge to edge. Now fold the square so as to create lines from, say, the bottom two corners of the square to the top central point of the square. These two lines will intersect with the previous created diagonals at positions which are situated at points which are a third of the width of the square.

This group of greeting cards were made using the first of the folding patterns illustrated above, and were constructed in the days before computers, using a typewriter to create the greeting. I think they were made in the early 1980s. Laboriously, each was typed having first worked out where the words needed to be in order for them to be displayed when the paper was unfolded, and then the design was folded. In retrospect, not only would they have been more interesting with the typing set at 45°, but they did not have the presence of a traditional card and might have benefitted from having a ribbon or decorative string attached in order that they might be suspended. I must have had too much time on my hands in those days…

This third illustration is another example of simple paper folding, but this time using paper which has been folded in order to create a pattern with a degree of depth to it, but not one which forms an openable container. It was developed in a study looking into the possibility of constructing a fabric quilt, but which I found also made an interesting paper study when two forms of the square were used together, spinning in clockwise and anti-clockwise directions.
There is a little more written about it on the page looking at design studies. This illustration shows a folded paper example on the right with, not to the same scale, the fold lines used in constructing the design. Note the asymmetry which creates the movement of the pattern.

The second example above takes a little bit of folding, but has the particular advantage that the overlapping folds create a simple locking device holding the concealed internal area secure. Nevertheless the device opens readily when the opposite corners are pulled away from each other. Here is a simpler version, though it does not stay as close-locked as the version above.
When closed this design can be seen to be a simple square divided into four smaller squares. There is no locking device. When opened, the length of the sides of each of the smaller squares can be seen to be determined by the length of the diagonal of the single central square. In a similar manner to the third example above, this was intended to be a study for a repeated quilt design. Although that project was never realised, the pattern above was at least made into a small mock-up and, later, into a five by eight folded paper wall hanging.

This final illustration of a paper container shows the construction of a triangular envelope. Actually, this is not really an envelope at all but a folded letter and, at one time, was a relatively common way of folding letters to give a degree of privacy in the mail. They were particularly used by Russian soldiers in the First World War with the advantage that they could be readily opened for censoring. While it is possible to use them today as single-sided letters, they have a potential use as a quick greeting card or message, though are best suited to being fabricated from 80 gsm weight paper – a fairly common weight of paper – rather than from card due to the problem there is in tucking in a heavy paper or card to make the final fold.

Here is another very rough example of a tato showing its face and back. The paper used was squared up from an A4 sheet of 90gm weight, far too thick for this type of folded design, but was used as I had nothing else to hand. As you can see, the folds are too thick and are virtually impossible to crease and fold flat. Pulling outwards on two opposite corners of the tato reveals the hidden pouch in its centre – the small square set on the diagonal of the photo on the right. Commonly referred to as the ‘hydrangea’ tato, it is usually a little more ornate than can be folded with this weight of paper, and there are a number of variations possible in its design.
Implements
Nowadays there are a number of proprietary implements for use in the making of greeting cards. I prefer the more traditional kind, but it’s obviously a matter of taste. There are a couple of things which will really make your life easier. The first is a good cutting board. Card cutting boards deteriorate rapidly and tend to lead the cutting knife away from the straight edge and are not recommended. A self-healing cutting board is best, and it should be as large as possible. They usually come with a plain side and a side marked with a measured grid to enable you to make right angled cuts relatively accurately, or to centre designs.
To cut card you will need a good straight edge which, obviously, should be longer than the longest cut you are likely to make. In my case the longest cut will be the long side of an A4 sheet. Add a little for overlap and this will suggest an optimum length of about 15¨ or 40mm. The material from which it is made should obviously be hard and accurate as well as relatively high in order to avoid the blade moving away from the card. This is important as I use surgical knives which are extremely sharp, the reason for their use being that they make the cleanest cuts of the card. It is also relatively easy to slide up the straight edge and across your fingers.
Which brings me to technique. It is really important to take the time to learn how to cut with the blade at the same angle. This should enable you to cut an accurate straight line as well as avoid chewing up the straight edge and cutting your fingers.
For gluing I use a glue stick though I’m aware of a number of alternatives. Essentially the glue should be relatively flexible and fast drying. It is also important that the glue is easy to remove from the cutting board or wherever you carry out the gluing, and it should be of a character that will not damage the artwork of the finished card.
Finally, for clean-up you will need a good quality, soft, white or colourless eraser to clean up any marks on the artwork. Oddly enough, white bread also works well. But whatever you use, always test the materials you use in order to ensure they will cause no damage.
Even more finally, always work with clean hands and equipment…
Because of the way I cut cards with a scalpel, I have to be extremely careful to concentrate at all times in order to avoid injury to myself, or to damage the set-square I use as a cutting guide which has a soft plastic edge. It is far better to use a metal cutting edge. Whatever you use, develop the habit of keeping your fingers away from the edge of the guide as you run a knife along it.
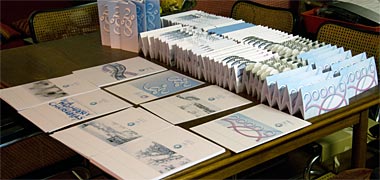

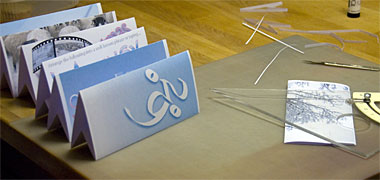
The first photograph, above, shows the tools used for cutting as well as half-finished cards that have been folded and glued but not yet trimmed. There are easier ways to manufacture cards but, where I want a full bleed effect, the un-printed part of the card needs to be trimmed away. The other need for trimming is that paper rarely goes through my printer exactly the same way each time. This means a small amount of trimming is required to tidy the card’s edges.
The middle photograph shows the work half way through with the printed cards on the left awaiting processing and the finished cards on the right. The lowest photograph was taken looking down, and shows the finished cards lined up and checked for numbers. There is then just the business of writing, addressing and stamping and posting them. The one lesson I re-learn every year is that it̻s never too early to being the process…
More recent work
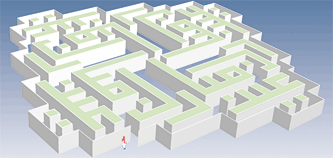
Here are another group of cards recently designed, the first three for an Islamic audience. They illustrate different approaches to this character of design, but are relatively simple in concept. All three are designed to be Islamic greeting cards and read ‘Eid Mubarak’, the first having a small figure looking at what is, essentially, a maze. The calligraphic style is very simple and I believe it’s now correct as the previous example had an error in the lettering which has been kindly corrected. It is a very much simplified version of a kind of calligraphic study that is common in Islamic design.

Here are two three-dimensional studies, which are two of a number made based on a similar sculptural concept. The first started off conceptually as a cube onto which the phrase ‘Eid Mubarak’ has been written and then the surrounding backgrounds recessed back following a set of self-imposed rules. The face of the lettering is coloured in order to make it stand out from the sculpted form behind it.
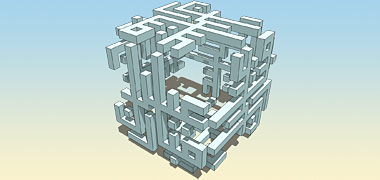
Compared with the design above, the second design is a development of the first in that the calligraphy takes the form of a three-dimensional line that wraps around the surface of an invisible cube giving the words more of a three-dimensional form. In this case I have not coloured the lettering in order that the form should take more importance. When working on this kind of design I like to carry out preliminary studies and then put them aside, returning to them later.

This is a more two-dimensional approach to the design of Eid cards and was developed from something I saw, I think related to an exhibition. The card, obviously, reads from right to left so I have placed the strongest colour, red, at the back of the four lines, and then repeated them in gradually cooler colours, moving down and off to the left. This may seem counter-intuitive but seems to work better than reversing the selected colour system. There is more work to be carried out on this some time.

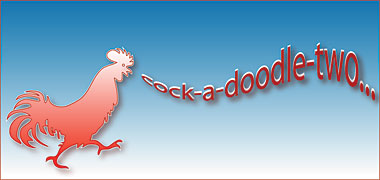
This next card is a birthday card with its design based on an illustration of an old Victorian phrenology head on which there are subjects written on it suited to the recipient. I’m likely to use the same idea again and, hopefully, improve on it with, of course, a revision of the phrases on the side. One simple way of improving this static type of design is to introduce a shaded background which will enliven the card as can be seen in this fourth card which was designed for a two-year old who likes hens. I’m not that happy with the lettering and should have spent longer on it. Remember not to leave projects to the last minute. Perhaps it’s a bit too sophisticated as it relies on somebody reading it to the child, but at least the colours attract and the cock is recognisable. Maybe I should just have used a cardinal number…

So, I should learn from this: the important thing to bear in mind when you are designing greeting cards, is to recognise the event and the particular characteristics of the person or people to whom you are sending the cards, and to design with these in mind. It also helps, incidentally, to make your design and sit on it for a few days while you think how it might be improved. In other words, always leave yourself enough time to change, develop or substitute designs.

These were the greeting cards for the end of 2007. There were a number of changes as there were a couple of others which were added, but this set are designed to have cards which might appeal to a range of ages as well as those who don’t celebrate Christmas and those who do. Two are based on my photographs, as is the camel but developed more graphically, the robin and Christmas cards are drawn, and the turkey was developed from a found image. Some cards are serious, some are supposed to be amusing, relying on the accompanying words, and the central one is simple calligraphy with 2007 on one side, 2008 on the other.
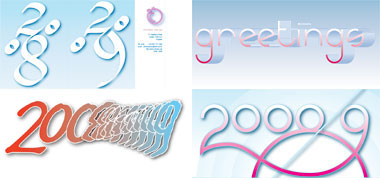
This lower group of eight cards – the four above and these four to the right – are rough designs for Christmas and New Year cards for the end of 2008. The top left of this group of four is designed to stand with the 2008 and 2009 faces displayed and the logo and address etc. on the back. Last year’s version of this card is shown at the bottom of the page. This time I did sit on the top four for a while in order to see which I thought would have presence. My habit now is to print them off and leaving them around for a week or so while I get on with other things. The lower four are still waiting a decision, though I can see already that I’m likely to use only three of them.

Using a common drawing programme, this card has a simulated film strip incorporating five photographs I took last year, four of them appearing immediately below. The simulated film strip is overlain on a typographical message, the pair of them curved to represent a religious symbol. It may be a little complex but there is always a problem designing cards for a wide group of recipients, some of whom expect a decidedly ‘Christmassy’ card, as they term it. Snow, a seasonal greeting and a religious sub-text should do it.

Here is a group of cards made from photographs incorporating snow scenes. All of the photographs were made in the north of England and were taken in an unusually cold snap in Spring rather than in Winter – not that the season is important… But illustrations with snow are traditional at Christmas, so it makes sense to use them for some recipients. None of these have a message on them, that is the purpose of the back of the card though, for certain recipients, I will sometimes add the more traditional wording they expect of a card on its face, carefully positioned and subordinate to the photograph.

The selection of an appropriate font, its size, colour and placing is particularly important as it would be in any designed item. I tend to make the selections based on the character and age of the intended recipients. The examples to the right are a quick illustration of the range of consideration the designs might go through, though I still prefer to leave lettering off the front of a card. Although it is not illustrated here, it is worth considering at this stage whether to have the design as full bleed, or whether to give it border and, if so, what colour and width.
The greeting cards for the end of 2008, shown above, were manufactured by the usual manual methods, the only problem being the number that are needed each year. Making a card for a birthday or similar event involves only a small effort and inconvenience. But making cards at home means that there is a process has to be developed and followed. This I find to be the most boring part of the process.

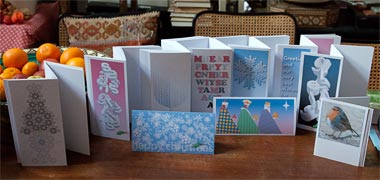
This photograph is of some of the cards designed for the end of 2009. There are about fifteen altogether which sit around waiting for me to go through the process of selection, amendment, refinement, reselection and then printing. At the most, five or six will be selected. As I must have mentioned previously, I like to have them sitting around for a time so that I can give them better consideration based on the different groups of people who will eventually receive them. In some cases a single card will go to a single person, but two or three of the cards will be selected to go to the majority.

This first pair of cards have been designed for young children and, therefore, I have traditional themes for them. While children might not understand the Roman lettering of the year hanging on their antlers, I hope they will recognise the stylised reindeer with his glowing red nose. The snowman with its carrot nose, coal eyes, glasses and old hat, scarf and boots is a regular theme and is a useful standby if all else fails.

This pair of cards represent another easy style to produce. They rely on simple lettering designed as cut-outs with a drop shadow to create a three-dimensional illusion. There are many different ways in which such designs can be laid out but their advantage really is the speed at which the designs can be produced, perhaps added to with related graphics such as holly. Perhaps I shall have one of those next year…

There is always the tendency to think of Father Christmas as a theme for the end of the year as children really do appreciate him, perhaps because of the association with presents. Here he is trudging through the falling snow, a pine forest behind him and a single yellow star to light his way. I was going to add lettering on the front but think it better without. As I have not yet made them yet, I can always change my mind.


This pair of cards were designed to make an impact through their use of strong colour. The first was to be used in 2009 but was cut as, although I thought the colour was successful, I decided that the lettering needed to be looked at again. The next year I amended the design slightly and printed this so that I could have a leisurely look at it, but am not fully convinced that it is good enough to warrant inspection, though the colour will certainly catch the eye. Perhaps if I add something to it, such as snow or that useful standby, the holly leaf with berries, its appearance might be improved. Changing the colour of the lettering should also be considered. Oddly, it appears a little better to me, here on the page, than it does in its actual form.
The lower card was more successful as a design but the colour is wrong for a seasonal card. The positioning of the lettering would also be improved if it was marginally higher.
For the 2010 season, the greeting card selection followed the same process as in previous years with a number of designs being produced and, for that year, ten selected to suit the various types of people to whom cards are sent at the end of the year. The major difference from previous years can be seen in the majority of cards being tall or portrait. The reason for this was time – it takes far longer to make the landscape cards than it does the portrait cards. The former require four folds and gluing with, often, trimming due to the printer not always moving the card through in a consistent manner. Portrait cards require only two folds. Note that there is also a small A6 card bearing a stylised robin. This allows two cards to be made from a single sheet of A4 card.
At the end of 2011, the same process was undergone with around twenty-five rough designs being produced in order to select a small number suited to the different characteristics of those to whom they would be sent. These next three illustrations are of some of those cards, showing how there seems to have been a distinct lack of originality, in my defence a state brought on by the lack of time and the need to do something quickly. What should have happened is that designs might have been created throughout the year enabling a more relaxed approach to selection from what would hopefully have been a better range and quality of designs. However, these designs are placed here to illustrate the manner in which the process of design and selection takes place. These are neither the finished designs nor the final selection.

The top two of the first group of rough cards use the Helvetica font, the numbers having been composed of written numbers in the top left one, and with written greetings in the top right and bottom left – the latter of which uses the Cooper font – and the bottom right example being an attempt to intertwine the outlines of the four numbers. The different characters of design and font have been reinforced by the use of colour and a notional drop-shadow.

The second group are here to illustrate how different approaches need to be made in order to create a degree of diversity to match the diverse individuals to whom cards will be sent. The top left is an amalgamation of an old woodcut with greetings behind them; the top right is a photograph of duck footprints taken last winter; next is a suggestion to rearrange the words into a well-known phrase or saying and, bottom right, a rather poor example using the outlines of a word.


This type of approach was also applied to the five vertical card studies where, in the first illustration on the left, a geometric study has been developed to produce an interesting panel design that might be appropriate for any greeting; the second illustration was constructed on a written message so is message specific; the third and fourth obviously relate to Christmas; while the example on the far right referred only to the New Year. There is, perhaps, only a single example from these two illustrations that might suit being sent to a young household, the one that mixes ‘Happy Christmas’ with a woodcut. Not all of these studies were actually used as, on reflection over time, most were dismissed. It is always important to allow sufficient time in which to make this kind of judgement.
The lower photograph is of the selected designs, printed, folded, glued where necessary, in the correct numbers and awaiting writing, envelopes, addresses and stamps. It’s about this time that my enthusiasm for making greeting cards flags significantly. They’re more fun to design and make, than fill in and send…

This group of cards is placed here to illustrate something of the process of design and selection. The designs were put together for the usual disparate recipients and show a range of character hopefully suited to them. More important for the purpose of this note, none of these cards are complete but are in the process of development. Most of them are arranged horizontally, but one is vertical and three are intended to be A6 cards. There are twelve greeting cards here and they will be developed and a selection made of, at the most, five or six.
Towards the end of every year the same process has to be repeated, the problem being to find new designs which are capable of being reproduced relatively easily and, hopefully, of being different from preceding years. In the event it is difficult ignoring what has gone out in previous years, so it will be possible to identify common themes, if not direct copies, of cards designed years earlier. One of the reasons for this is the number of cards made. Making cards for individuals such as birthdays and anniversaries, enables more time to be spent on their design and production. Towards the end of the year it is a different matter, time often having to be allotted to competing tasks.

This animation, and that two illustrations below, are similar to those above but illustrate a number of rough designs made for the 2013-2014 festive season. They are not perfect but represent ideas for later consideration. The same thinking goes into them as is mentioned above – they have to suit a range of ages, religions, interests and the like, but some of them are more personal than might appear to the casual viewer or stranger. What is particularly noticeable in the two animations are the variations on a theme that develop, notably in this illustration.
Although there can be seen to be a number of similar ideas here, there are many others that were discarded and have not been shown. This is all part of the process of design. Perhaps I should show a selection of these to illustrate the process and show how small some of the design decisions can be.

This second pair of roughs are A5 in size and the easiest to make as two are printed on an A4 card and require a single cut and fold to complete. Because of this it is also relatively easy to customise them with additional cuts and folds to bring a little more interest to them. This pair were not designed as such but I have it in mind to develop something along those lines, but perhaps next year. It’s probably mentioned above, but I prefer the three-folds for visibility and the horizontal cards for stability. A5 cards tend to be lost when put with a lot of other cards.

The first set of animations above were designed as vertical three-folds which are easier to make than horizontal cards. The latter – a number of which are shown here – take longer to fabricate and there were less of them than the vertical designs, not intentionally, but it was just the way the designs were thought of. In fact, the easiest cards to make are the A5 sized cards, a pair of which are shown above. Bear in mind that all these are rough designs from which the eventual selection was made and refined.


The cards for the 2014 festive season were designed in a similar manner to those above, the decision being taken to make most of them vertical as that process takes less time to manufacture. Around thirty different designs were drafted and, from those, a dozen were selected suited to the different individuals and families to whom they were to be sent. This photograph shows them printed, creased and folded prior to being completed and posted, the process taking two days. There are also three birthday cards for those who are unfortunate to have their birthdays at the end of the year. The animation below it shows a little more detail of eight of the vertical cards whose height is the width of A4 card, 210 mm. Those designs that didn’t make the cut will be put over to next year, both as a start to the annual process as well as providing a resource in case there isn’t enough time to design new ones. Some of the favourite designs from past years also find themselves being re-used. Hopefully they will not be sent to those who may have previously received them…

As with the previous year, the cards for the 2015/2016 festive season were developed from a number of sources, some of them being the rejects of previous years, with or without work being carried out on them. The final selection is shown here, nine cards whittled down to a quarter from those developed. Every year there are photographs I would like to use but the characteristics of my printer do not produce the quality I would like – hence my preference for vector illustrations or posterised images. As can be seen from this group of cards, many of them are similar to others designed in the past or even this year. But it is useful to print out one of each in order to see them over a period of time before making the final half dozen selection. Bear in mind that they have to be suited to a variety of ages and religions, and note that not all of them have the greeting on the face, but will have them written inside. In addition to the nine below there were three birthday cards.

Again, the process of designing produces the first roughs from which the eventual choice of cards will be made for the end of 2016. Here are twenty designs which will be whittled down to five or six to suit the variety of people who will receive them. Some alterations will be made as there are not only improvements to be made, but the printer tends to trim differently from the way in which the design is made. There are two A5, four landscape and fourteen portrait designs. One or two of them are based on previous designs – not always successfully – and a couple of more original ideas; but I feel that there are much better designs from previous years and, next year, may use those cards again, endeavouring to ensure they are sent to those who will not have seen them previously.

Every time I look at a selection of seasonal cards I’ve made, it seems that I should have been trying to design a range that is radically different in concept from those which have gone before. Perhaps it may be that I should be creating more hand-crafted designs rather than going for designs suited to replication. But these take considerably more time, so I don’t – except, of course, those made for birthdays or individual events…
Looking over this page, as I tend to do only once a year, it’s notable how similar many of my designs are. It’s difficult to come up with radically different designs every year, bearing in mind that I feel limited to designing greeting cards on a computer, rather than individually making them, and to printing the designs on white A4 card. In essence this is because I have to make a significant number at the end of each year, although these are restricted to a small number of different designs – around a maximum of a dozen selected from about two dozen draft designs.


To illustrate something of this problem, here is a photograph of a group of rough drafts made mostly in Autumn for the turn of 2018/2019, with both traditional and non-sectarian themes to suit the characters of the different recipients. There turned out to be a total of around thirty-two, give or take a variation or two, from which a selection of eight was made. I find it useful to print one of each in order to get a better idea of how the design works. Often this means that there are a number of similar cards as an idea develops. As I’ve written above, it always seems that previous years have better designs than those produced for this year, which makes me think that I should really start to re-use earlier designs which don’t include dates.
Not illustrated here are a small number of birthday cards for those whose birthdays unfortunately fall in late December and early January.
As always, none of these designs is thought to be a finished greeting card, and some will be scrapped or maybe held over to next year. If it were practicable I would prefer to make each by hand using a variety of materials and some of the techniques outlined above, particularly cutting and folding.
This year, not all of the designs are made from a single A4 sheet. Some have been designed as A6 cards, two to an A4 sheet, though I prefer the two-fold A4 cards. Cards made from a single sheet of A4 are both landscape and portrait in design, the landscape cards requiring glue and an extra two folds.


And the same is true for all those birthdays and anniversaries which fall unfortunately within the 2019/2020 season. While those cards were made with a variety of formats and sizes, the decision this year was to have all the seasonal cards in portrait A6 size, mainly for ease of fabrication.
Again, the main design problem is to have a range of cards that will suit very different audiences. This year somewhere around thirty rough designs were made from which nine were selected, and are shown in the top illustration. Those not chosen usually are put into a folder for next year’s consideration when they might be adapted to form the basis of new designs, or even used as they are if there is insufficient time to create new designs.
A number of the rough designs did not proceed due to the amount of work that would have been entailed making them. Three of them are shown above here in the lower photograph, the card on the left is shown without the graphics that would have accompanied it as a New Year card. Nowadays a simple search of the Internet will show a large number and range of cut-and-fold designs of better quality than these. Generally, these cut and folded cards are known as kirigami.

And here are the cards that eventually made it for the winter of 2020/2021. This time I didn’t keep them all to a single size but split them as you can see; four of them A6 on face, five A4 folded twice. The same principles mentioned above applied to the eventual selection, with cards ranging from one for very young children to a couple for older people as well as two targetted at very specific individuals while some catered for different religions and views on religion. I have yet to bring myself round to wishing anybody ‘Happy Holidays’. It may take some time.
For the cards of the 2021/2022 winter a different approach was taken for a number of reasons. The next graphic shows twenty-one of the designs, in no particular order, from which the final selection was eventually made to suit the intended individuals and groups as mentioned in the preceding paragraph.

It was decided that the cards would all be the same size, A6 portrait, that there would be a wider range than usual, and that some of the designs from previous years would be re-used in order to save time. In the event this latter decision was illusory as those selected were all amended one way or another. However, looking back at previous cards is likely to be an exeercise in forthcoming years, though this is likely to lead to the selection of quantity rather than quality.
One new exercise this year evolved from the decision to make a card based on Arabic for Muslim friends. ‘Winter greetings’ was thought to be a suitable phrase as some of the cards above used that phrase or ‘season’s greetings’ together with, usually, an illustration of a wintry scene.


Consequently, a number of design variations were made based on the phrase ‘winter greetings’, this being translated into Arabic as tahiyaat al-shitaa’ and created in a kufic style, the basic design rotated in steps of 90° to form a symmetrical pattern. The use of kufic is due to its relatively easy design capabilities for those with little understanding of Arabic.
A little licence was taken with the design as the three dots which distinguish the letter sheen of the word shittaa’ were replaced by the hamza symbol ending the word shittaa’ as shown in the two alternative designs in the first of these illustrations, the graphic on the left being the more ‘correct’ version of the two as it has the diacritics of sheen.
Although a number of alternative designs were looked at with a view to making a stronger image, it was eventually decided that the design didn’t really lend itself to being a strong graphic when seen at a distance, though in the hand, or seen at a close distance, it might still be considered suitable. The decision to use drop shadows and white outlines to the stroke were also tried out as well as leaving the design just as a graphic on a plain background as in the first of these four illustrations.
The fourth graphic illustration shows three alternative studies of possible colour arrangements considered for a finished card, the internal colour of the design being the same in these three variations as well as many others.

In whatever manner a kufic phrase is established in a repeating design, it is usually possible to extend the design infinitely, as is partially demonstrated in this example. Some investigation of the way in which the initial design is established needs to be undertaken in order that the best fit might be made. As can be seen in this case there are a number of open areas in the overall repeated pattern. It is also noticeable that the basic grouping of the four phrases moves a small distance both down and across as it repeats, avoiding the rigidity of a grid and giving some semblance of movement across the overall pattern.

For 2022/2023 many of the designs were copied from previous years for a number of reasons. Some were rejects from previous years, while others were amended in various ways. As long as they are not sent to the same people as in previous years it was thought to be a reasonable compromise enabling the design process to be shorter than in previous years.
As a consequence more were produced than usual, though of course with more similarity. This illustration shows the first selection of twenty-five plus a twenty-sixth which has all of them as a single image. They are preliminary rough designs. From these ten were selected for printing and sending – and the others will be put aside for consideration next year… Incidentally, the ‘salvete’ design means ‘greetings’ in Latin, the figure above it being MMXXIII joined in a continuous manner. Next year it will be a little more difficult to make the lines work as cleanly as this year’s design.

And here, well before time for a notable change, and in no particular order are the ten selected for this year’s winter greetings. It’s not fashionable nowadays to wish people ‘Christmas’ greetings, and there are many recipients who would not appreciate it for religious or other reasons, but the main rationale for not using that greeting is that it doesn’t really feel like Christmas nowadays… But it is always possible that this will change, particularly for families with young children in the house and, perhaps, for the very old. The other fifteen will be held over to next year – if they don’t have the year on – and be joined by new designs for eventual selection.

Somewhere there must be a mention of re-using old ideas or of developing graphics that have been used before, even if it is just by changing colourways. But when there is not a lot of time to make completely new designs, or when invention won’t come, then the time has come to use old designs so that at least there will be something available come the deadline. Here are three dozen ideas, brought together well before for the end of 2023/24 when, hopefully, a decision will be made to make a final selection of ten with appropriate amendments.

Well before the end of the year the decision has been made to tidy up the designs and print them and move on to birthday and anniversary cards, a number of which coincide with the end of the year. Last year it was decided to print only ten different designs, this year twenty have been printed though there is no apparent reason for this. Those which have not been used this year will be looked at again next year with the possibility that some or all of them will be used then – unless what are considered to be better designs are produced. For better or for worse, here is the final selection which, as can be seen, are designed for a range of tastes, ages and religions.


One of the difficulties in designing greeting cards for the end of the year is that of thinking of new designs. This tends to mean looking over old designs with the possibility that they might be selected and repeated, sometimes exactly, or at least as variations; unfortunately I find that it is too easy to copy and make variations of old cards I still like. This may not be a problem if the same or similar card is not sent to individuals the next year, but there is always that possibility. In this first illustration there are just some of the designs and their variations made during the year to August, from which the choice will eventually be made for, at the most, a dozen different designs, probably less. Those which use the year’s date obviously can’t be re-used next year.
The lower photograph illustrates the twenty-five cards eventually selected for the 2024-2025 winter season; but this whole exercise illustrates the need to have fewer designs even though they have to satisfy a range of tastes, ages, religions and family sizes. Hopefully the lesson will have been learned for next year…

Congratulatory cards are required for a number of birthdays, anniversaries and other events which mark our lives through the year, but there are many of them bunched around the winter months. So, following on from the design and printing of Christmas and New Year cards, it seemed sensible to continue the design process and make a number of cards which could be used as and when the different occasions arise. Here are a dozen which hopefully will be varied enough to cater for the different events, in particular by having no words on the front; the main problem being in keeping a track of recipients. One of these is is a spoof card with over a hundred varied greetings in different languages which just require the appropriate box ticking before sending on different occasions.

Which brings us to the 2025-2026 winter season and the need to produce cards before the year runs out. Last year the decision was made to have designs printed as A6 cards, and with a large variety of designs. As might have been anticipated, this caused problems in selecting appropriate designs for the differing recipients. This time the problem may be worse as only ten designs have been selected.

As for the designs themselves, there were a number of designs made for the previous year that it was thought expedient to develop or use which had rejected last year. There were also one or two from previous years still considered for using again, or at least developing. In the event, three were produced from photographs made last winter featuring birds and a fallow deer in snow or ice, another three are year specific, one relates to winter and one to Christmas, one just says ‘greetings’ and the last is based on an Islamic pattern made some time ago; so there should be a reasonable spread of choices for each recipient.

Rather than have A6 designs printed again, the decision was taken to have the designs printed as A4 flyers, allowing the cards to fit into DL envelopes; the disadvantage of this is that the flyers have each to be creased and folded, though the quality and heavier card are better than can be created on my domestic printer. The other advantage of having cards printed as flyers is that there is the possibility of having a design on what is now the back of the flyer. The decision was easy but the design not so. A more sensible design would have taken recognition of the three panels created by the folds but, in the event, it was thought unnecessary and it was eventually decided that a single bold date printed over the full width of the card would be the solution. Not so sure now; next year is likely to be different.

Most of the cards illustrated here were produced for happy occasions – birthdays, holidays and the like. But sometimes there is a need to produce a card for a sad occasion. It is a time when the more formulaic character of card needs to be carefully considered as not only will the recipients expect a traditional response, but it is common for cards to be inspected carefully by all who will see them. In these cases both the words and subject need to be relatively traditional and, in fact, it is difficult to find appropriate words for cards on these occasions, the words ‘sympathy’, ‘thoughts’ and ‘condolences’ being the main ones used. Here is one of the simplest cards I have designed. It is deliberately designed in shades of grey to have a classic feel, and uses a simple cursive font to give a personal feeling which, in this case, reflected a particular interest of the person who died. Having said that, there is a small amount of confusion between the lettering and the image behind it, which might have been avoided with a bit more thought.

This group of vertically organised cards represent a minority of greeting cards I make. They were designed for birthdays and an anniversary and are typical of the way I like to use letters as design elements. The second card from the left is a very fast way of producing an effect, though may not be to everybody’s taste. The central card has the lettering down-played in order to concentrate more on the portrait, one which has been reduced in colour by posterising, though it is not possible to see the effect at this scale.

Far more typical are cards with a horizontal orientation, though I’m not too sure why this would be – the reason is probably the stability of the horizontal format compared with the vertical format. Here are a selection of recent greeting cards, mostly birthday cards, but with an anniversary, Valentine and end-of-year card thrown in for good measure. They were designed for people of different ages and character. What all these greeting cards miss, of course, are the personal salutations which, in the case of these cards, go on the back.
Other sources

There is another source of card material which I use from time to time; old illustrations. There should be no copyright problems if they are used individually for friends and family and if there is no commercial use. There are some beautiful old graphics which can either be used as they are or, as in the case of the upper two cards, with my own tag lines. The lower two are cards I have set aside for emergency, when I will find something to add to them in order to produce a personalised card for a friend or relation.
The lower card was designed in the same way, using an old graphic illustration with a custom tag line. It’s a relatively easy way of producing a card for an occasion which can’t be found in the selections provided in the many card shops selling cards for most occasions – but not quite the one you really want….

But it is not only old graphic material which can be used for this type of greeting card. This card is based on a photograph taken in a park of three teal ducks and has had a tag line added to it. Usually I find that I think of a better tag line some time after I’ve sent it – which is one reason to try and make these cards some time in advance, giving yourself time to think of something amusing or more relevant to write.

And this is, too, is obviously a card based on a photograph. The image has been posterized into six levels which, at the time, I thought the optimum. At this scale I think it might be better at four levels. The make of the camera was amended to read ‘Happy Birthday’ in a similar font to the original but, of course, a smaller size. I had thought of using the lettering around the lens to write a message, but decided that at that size it would be too small to read well, so the greeting is on the reverse.

At the top of the page there is a design based on an initial drawing of the ‘Cutty Sark’, the famous clipper which, in 2007, was severely damaged in a fire at its dry dock in Greenwich, London. The same technique I used there has been used for this design of a cat. The technique is simple and lends itself well to designs where there is a simple silhouette, creating a dramatic design which will stand out from cards around it.
The key thing to bear in mind is that each card should be crafted to suit the character of the recipient as well, of course, as the event.
Early work

This next group of illustrations are of greeting cards that have been discovered in various odd places over a period of time. They are placed here mainly as a record because it is quite likely they may disappear again. They are not necessarily good of their sort, but they remind me of something of the period, and I would like to keep something of a record of them.
A couple of the designs were uncovered during a move, the third one come across by accident. It was interesting to look back and see some of the things prepared as far back as the 1960s. I know that there were many earlier drawings and illustrations but I believe they must have disappeared long ago and it was quite surprising to come across these. The first two exist only as copies of the originals, some of them dyeline prints, and have discoloured with age, regrettably not evenly.

The first one was a three-panel card designed in a fashionable free form lettering style that was relatively easy for anybody to form. It, and those in the second illustration were very typical of the nineteen-sixties. The second illustration shows three cards which were sent in 1967, 1968 and 1969 respectively. These were all studies and not the original cards as they are produced on tracing paper and sent as dyeline prints, which accounts for the mottled effect – though I have cleared this on the outer edges of the central one.

The final illustration is an original card that was sent around 1970 and uses a partial quote from the Rubáiyát of Omar Khayyám. The card had also faded at the edges as it, too, was a dyeline print, but that has been corrected in this reproduction in order to illustrate something of the power of the original. I doubt if Omar Khayyám or his translator, Edward FitzGerald, would approve…
Design studies | top | Posters